Peter came over this afternoon and we made progress on building the aircraft. Today we completed Step 3 and made progress on Step 4. If anyone is curious, for the fuselage there are 11 steps total of which Step 10 is a biggy.
Peter brought over a bunch of balsa block scraps we could use for positioning/stabilizing the doublers (FUAs) along the balsa stringers. We started by figuring out what we would need and where, including heights, and making them. Used some CA to glue pieces together, then cut them out and sanded so they’d fit flush to the sides. You can see the pieces we made in the featured image at the top. We also slid some pieces underneath the stringers, as they are raised off the surface, to ensure the balsa stringers are snug to the top of FUAs.
Oh yes, technically it is the top as the fuselage is getting built upside down, encase you’re wondering.
We also took a look at how we’d be gluing FUH in place and cut an additional 1⁄4” x 1⁄2” balsa block with a length of 1 13⁄16” to support the middle (ensure it is glued level). We used some thin CA to hold the piece in place, planing to break the glue joint and remove it once FUH (FUG on the actual piece) is set.
With a plan in hand I marked where the formers sit on the stringers and where the front ends fit into the FUAs and then mixed up a big batch of glue. I then applied glue on the front ends and top of the end of the balsa stringers along with where the formers are going to be sitting. Once that was done I placed glue along the top (technically) edge of the doublers and in the notch where the balsa stringers fit.
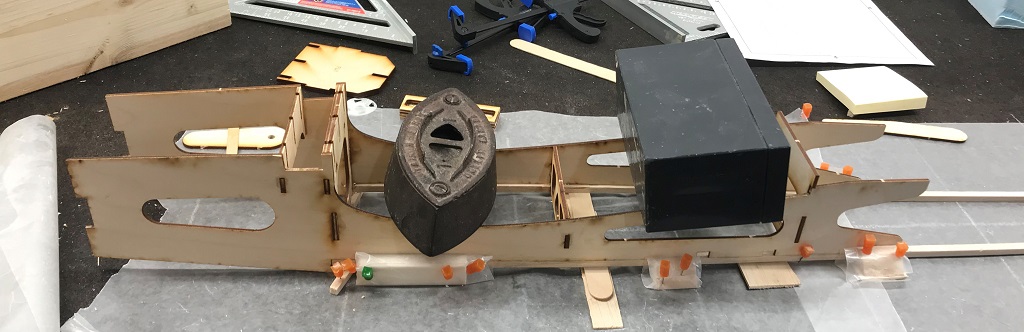
Once all the glue was applied we placed the piece on. Getting the stringers tight up into the FUA slots and flush with the outside. We slid some sticks and sanded down balsa pieces to make wedges for under the stringers to ensure the FUAs and stringers were tight against each other. We could see no gaps along the length so added some weight on top to hold everything in place.
You can see how we left things in the featured image above. How the balsa blocks used to make sure the sides of the FUAs are flush with the sdie of the stringers are wrapped in wax paper (to ensure they don’t get accidently glued together). This is also on the far side to keep things in line there as well.
The last thing for the day was gluing FUH into place, seen below. All that was needed with the additional support in place was some glue along the front edge and on top of the back balsa block. I also used the square to help ensure it was centered as best I could get it.
Looking down the length of the fuselage we could see everything appeared to be lining up great and in position. This wrapped up our Sunday building session.
