Wednesday I made more headway on the build, working together with Peter. First we removed the balsa block from tail that was temporarily glued in place to help support FUH. Then we moved on to this sessions main goals.
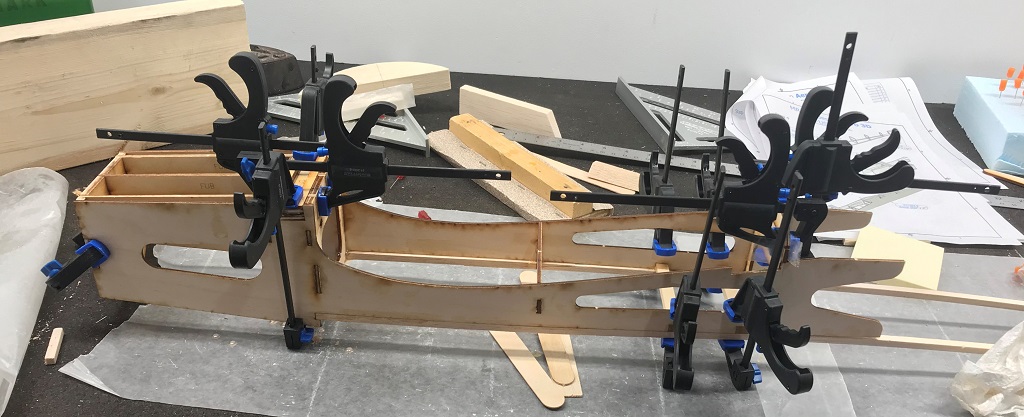
From a session by myself I had already prepped the FUBs to be glued in by sanding them and continued this session by ensuring the fit of FUDA (landing gear block) by trial fitting it with the FUBs in place and doing some directional sanding to get the outter edges to flow with the curve of the fuselage. During all this trial fitting we do have the firewall (F1) clamped in place, but not glued yet.
For the FUG pieces of 1⁄4” x 3⁄8” hardwood, to be the servo mount for the rudder, elevator and throttle, I placed it in and made a line with a pencil to mark the length and then sawed it off and repeated for the second piece. The measurements in the instructions are to make it 35⁄8”.
Once we were happy with how all the pieces (FUBs, FUGs & FUDA) were going to glue in place I mixed up a batch of glue. I started by:
- Placing glue on the parts of the 3 FUBs that will be in contact with the main part of the fuse
- Getting them set into place (I did not do the front portion slotted into F1 as it is not going to be glued into place yet)
- Placed glue on the FUBs where the landing gear block is going to sit as well as along the length of the sides of FUDA that will be in contact with the fuselage
- Put FUDA in place
- Ensured everything was squared up and clamped it into place
The result is in the two pictures on the left below, a side and top down view. Next I glued the two pices of hardwood into place by:
- Sliding the first piece of hardwood through the first slot
- Placing some glue in the far slot as well as around both ends of the hardwood
- Pushing it through and into the far slot
- Repeated this for the second piece.
The reson for sliding through the first slot prior to glue application is that you’ll push all the glue off and along the hardwood where it isn’t needed as you slide it through the first hole. Maybe obvious, but oversights do happen! 🙂
I then clamped the hardwood pieces into place… due to the awkward location its clamped as best I could from the top and bottom to apply a little pressure.
The glue was placed outside as we thought we were done, but then looking ahead we realized there was one more step we could do. Peter brought the glue back in and we determined we were good to proceed so I:
- Cut FU6B out of the plywood
- Sanded the edges
- Applied glue to the bottom
- Clamped it into place on top of the former FU6
The result is in the far right picture below. The evenings session completed steps 4 & 5 of the instructions.


