Being Family Day in Ontario I got over for an afternoon building session with Peter. I started off where I left off, the rudder. I used the heat gun to shrink the covering over the ‘holes’ in the rudder and then using the markings on the fin figured out where the hinge marks were hiding under the covering that was over the leading edge. I then used the back tip of an x-acto knife to open up the hinge slots, hard to see below 🙂

After that was finished up brought the fuselage up onto the workbench as I’m now on to covering the fuselage! As you’ll notice from the pictures I am doing the fuselage and fin white. Because you want your seems to be such that the covering is overlapping from front to back, prevents the air from getting under and peeling back the covering, we start at the table and work our way towards the nose of the aircraft.
I started by covering the trailing edge and top of the fin. I ensured there was about a quarter inch wrap around on each side for both pieces. After ironing on the top piece I cut two slits on each end followed by ironing down the folds on each side of the top. Due to the slits I was then able to iron the pieces for the sides around followed by the overhang from the top down. I then ironed on the trailing edge, including the fold over onto the sides, and then using a blade cut off the excess that was coming past the top and bottom.

Flipping over the aircraft I did the aft end of the fuselage and in prepping the white strip I cut it at an angle to try and get a similar amount of overhang on both sides throughout the piece. Since it is in a “V” shape you require a thicker piece as it moves towards the front. Once you get the bottom on you fold the covering over and do the sides followed by using the blade to strip off the excess that protrudes past the back.

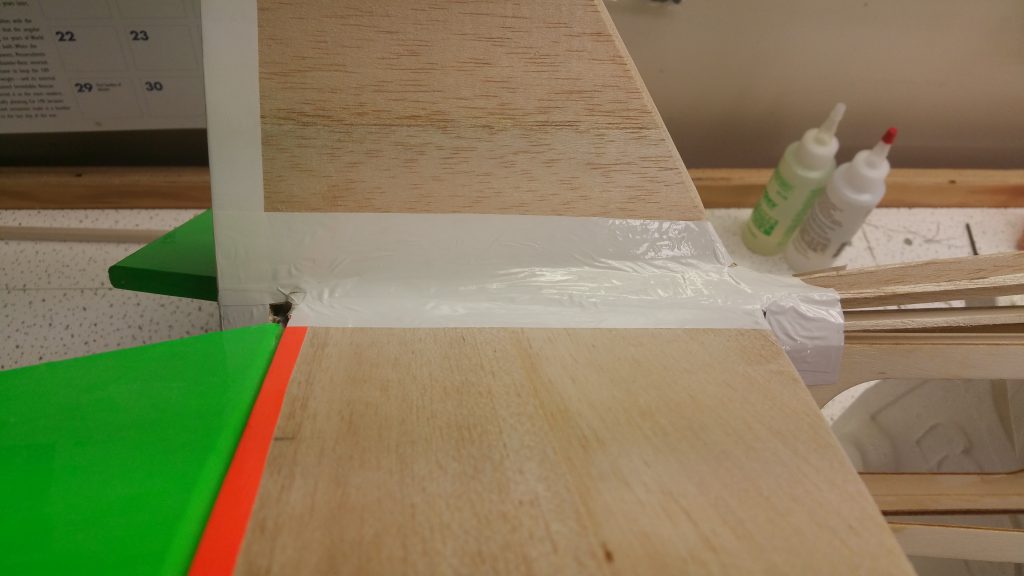
I also, seen in the picture above and below, placed a piece of white covering to ensure there is no exposed seem where debris can get into the wood. I cut a piece that was wide enough and then folded the piece in half. I started ironing the piece on by running the iron along the ‘corner’ where the fold in the covering is (the stabilizer meets with the fuselage) and then working both the top on to the fuse and the bottom on to the stabilizer. Making appropriate cuts I folded a piece around the leading edge of the stabilizer and also ironed on (seen above the leading edge of the stabilizer) the remainder of the piece from the cut that is still attached to the main piece around the curve of the fuselage. At the trailing edge I made a couple cuts so that I could trim off the excess white (at an angle) along the trailing edge so it sits flush, didn’t wrap it over the edge. I continued the main piece to the back of the fuselage and trimmed excess off. I also did my best to make cuts and iron the covering around where the wire for the elevators is to get the exposed wood covered. This process was repeated for the other side.
I also covered the tips of the stabilizer today and sticking with my overall pattern I did them in green to match my wing tips. The process for this was similar in that you start with a piece with some overhang on both sides, cut slips at the corner angles for the trailing edge and four cuts for the leading to help get around the rounded corner. You then continue by ironing on the sides followed by ironing around the sides pieces from the aforementioned cuts and then lastly the top overhanging pieces gets ironed down.

I didn’t necessarily go in the order of which I did the tail; so I will mention one last thing that I did at the beginning. I temporarily put the engine back in place so I could mark and drill the hole in the side of the fuselage for adjusting the low speed and made the whole a little bigger as need to get in with a screwdriver instead of fixing a wire for adjustments. Though this might not look like much progress to the untrained eye to get this all accomplished this session took a little over 2 hrs, at which point it was time to stop with the plan to reconvene tomorrow after work.
Edit (Feb. 21st @ 1230): Forgot to mention that in conversation with Peter over beverges afterwords we thought might be done by mid to late March.