Winter is upon us again… that means it is back to building season! This build is going to take on a bit of a different dynamic as a big thank-you goes out to Peter & John for helping me build a workbench in our mudroom. I’m excited to be able to go at my own pace from home and see how well I do as it’ll be less structrued and me troubleshooting alone along the way… that said the guys are not far away if I require assistance!
Speaking of, on Nov. 17th Peter came over and graciously leant me some tools to get me started. We looked through the kit, explorered the manual, came up with a game plan as to how to approach this build and interpret the diagram based building instructions. Mr. Aerodesign approaches things differently. More thoughts on this in a future post once I have more experience.
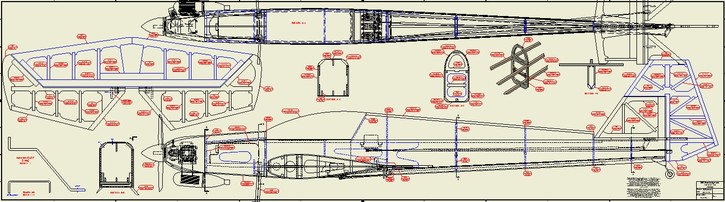
The aircraft I’m building is an Aero 3D, which should allow me to get into 3D flight (also good for smooth flying) as the thick airfoil and oversized control surfaces give this aircraft exceptional flight caracteristics, supposedly and what I’m hoping to find out! 🙂
Throughout my posts I am going to describe the pieces as I think they are with the labels Mr. Aerodesign provides in the manual, i.e Former 7 (FU7).

Aero3D Laser Cut Sheets 
Aero3D Sanding & Prep 
Aero3D Sanding Close-Up
While Peter was there I cut out a half dozen pieces from the two 1/8″ ply sheets to start the rear of the fuselage. Specifically formers 7-10 (FU7-10)
On Nov. 18th I gave all the aforementioned pieces a light sanding to remove the ‘laser burn’, which helps the glue stick. Need to make sure you don’t oversand; otherwise, where the 1/4″x1/4″ balsa stringers fit into, or other parts go together, will be to loose.
I skipped step 1 as it requires some gluing, but will prep those pieces and do some gluing once my supplies arrive!