Yesterday Peter and I put in another solid 2 hrs working on the plane. John came over as well to check out how things were going. I am getting a bit ahead of myself though as Peter checked to see if the angle of incidence on the wing was correct and in his email, I quote Peter, “You have built a great wing and fuselage. The wing and the fuse mates up properly and the incidence measurement is right on. John came over and installed the hinges on the elevator and we attached the elevator to the horizontal stabilizer. Another great fit.”
So that made me very happy to know that my hard work and attention to detail is paying off! Another thank-you to John for covering the rest of the elevators so that he could hinge them to the stabilizer.

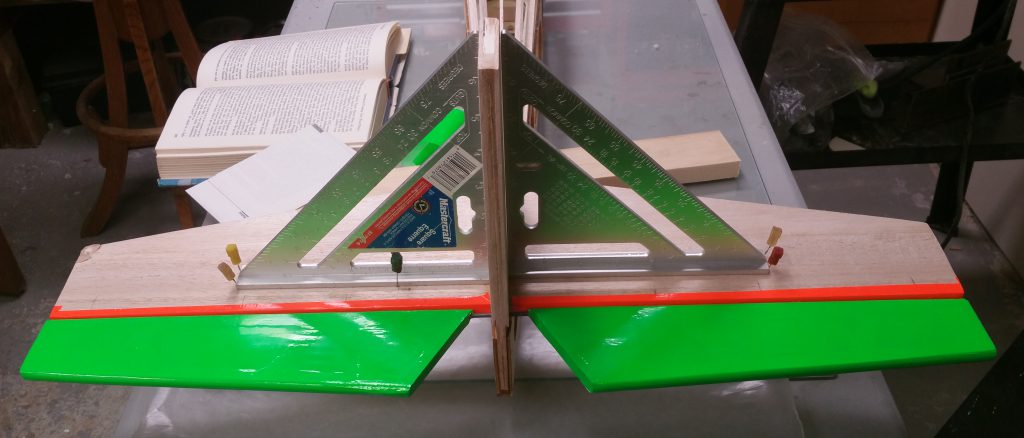
Prior to getting to work I checked the angle of incidence for my self, so that I could learn how it goes. In the picture above you can see that in order to get everything lined up right you need to have a starting point, which is ensuring that the stabilizer (back at the tail where you see the level) is level. John has told me stories about planes that do not have a level stabilizer flying very well but the idea is to have the stab level! You then ensure the angle of incidence for the wing is correct (I can’t remember specifically what it was for this aircraft, but I want to say 2°).

Next what I did was glue the fin into place. Though you can’t see in the picture when you put the fin in there is a longer ‘stick’ that slides down into the fuselage and between the ‘stick of the fin’ and the fuse lies the piece of metal that connects the two elevators. You need to ensure that when the fin is in place the elevators are able to move up and down unhindered by the fin being in place. In my case it worked out nicely, but if for some reason there was to much friction you would need to sand a little groove out of the ‘fin stick’ where the rubbing is occurring.
Once I ensured the fin was straight (held by Peter) I traced the edge of the fin so I would know where glue needs to be applied. I then placed tape along both sides (also two pieces of tape along the bottom of the sides of the fin) as would prefer to minimize the amount of glue that gets on the stabilizer to make it easier to clean up prior to covering. Then I place glue between the two pieces of tape on the stabilizer and along the left and right sides of the ‘stick’ as well as the bottom, those are the three points of contact within the fuselage. I then put the fin into place and used the ‘triangles’ to how the fin vertical and centered properly on the stab. Also placed a pin up at the front to hold it centered. You can also see in the pic below where we used filler to fill in where a piece of the stab sheeting got banged. You can see this from the back view in the featured image at the top of this post.

My last task for the day was covering the wing tip. Out of the two hour building session this took over an 1h in 15mins of it! I greatly appreciate the tips from John in how to cover. In order to accomplish this I first cut a piece of green covering that left excess on both ends as well as top and bottom. You then start in the middle, apply heat, and work your way out to the edge, top and bottom as well as back to front to remove any bubbles or creases (as best you can) from the surface. You need to cut the covering at the trailing edge along the same line as if the top and bottom edge kept going. You then fold that over and iron it to the trailing edge.
Once that is done I did the flatted part from the trailing edge up to where it starts curving by the main spar. You need to keep the iron flat and then go up and over the edge and along the fabric (outside side to inside) pulling the covering tight as you go to remove wrinkles/bubbles. Once up to the main spar in order to do the rounded edge you need to make cuts along the covering. What I found best is to do one at a time, cut a section and then iron it down, cut another and iron it down, so on and so forth until you get to the middle of the curve (that is you are no longer on the top side of the wing but now transitioning to the bottom, or vise versa).
Once you get that done you need to do the same process on the other side of the wing. Once done you go back to the trailing edge and fold the two outside pieces over and iron it down. It’s very demanding of your patience and persistence in order to get a nice look!

Here’s another picture I took before taking the plane of the contraption which shows when checking the incidence that the stabilizer is level and also better displays what the elevators look like after being fully covered.

Pingback: Building 4 Star 60 Day 25 – Devin W.C. Ryan