Today, after quite a hiatus do to not feeling well and timing, it was great to get back to working on my plane this afternoon. The theme of the day was covering, lol.
I started by continuing where I left off and covering the fuselage bottom front, seen below. For this piece I made sure that I left about a quarter inch to wrap around onto both sides of the fuselage and enough excess at the front to get a little ways past where the “cut out arch” is. The main surface ironed down smoothly, I tacked it up at the top near the landing gear plate, pulled the covering tight and then tacked it down near the top of the arch. Then starting at the landing gear plate end I worked from the center of the fuse bottom out to the one edge and then the other working in this fashion towards the front.
In order to properly iron the edges over the side I needed to make a couple cuts along where the arch starts working my way towards the front to allow me to iron over the edge and onto the side of the fuselage. I also made a cut near the front to allow me to iron the covering along the edge past the bottom of the arch a little ways and again over onto the side. This was then repeated on the other side.
Next the bulk of the covering which was over the open space of the arch was cut away except for a tiny bit of excess. This excess was then cut about every centimeter or so (there was no exact measuring here), but frequent cuts were required in order to iron the covering over the edge to cover the ‘thickness’ of the sheeting to prevent wind from getting under the covering.

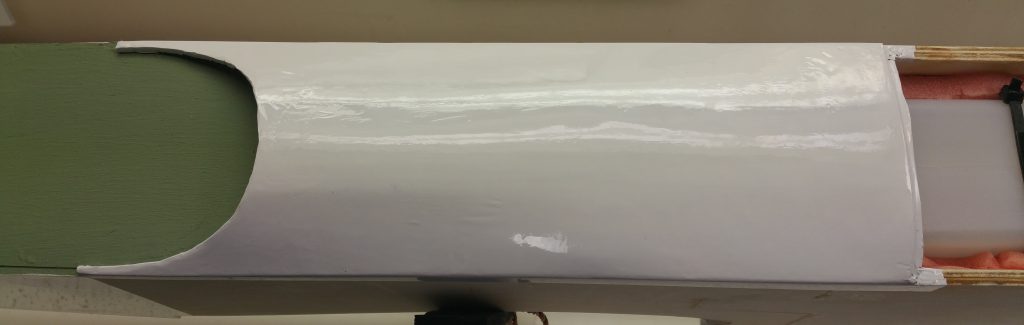
The next task was to cover the top deck. First I did a little sanding as there was some filler along the the edge of the ‘arch’ that needed to be sanded off as well as a drop of glue on the deck itself. Once satisfied I measured out a piece of covering ensuring there was some excess on both ends as well as the sides.
I started again by tacking the covering at both ends (length wise) making sure it was taunt and then ironing down the covering of the entire top deck. I then focused on the front end and making the necessary cuts to allow the covering to come along the edge of the fuselage side a bit as well as to fold down to cover the inside and along the edge of where the hatch cover for the fuel tank will sit. Due to the arched nature of this I needed to make a cut at the one end to finish getting the cover wrapped over without wrinkling horribly. This did involve some ‘un-sticking’ as I attempted without any cuts first so the one end folded over and stuck to itself. I then switched over to finishing the other end which contains the arch.
This end was time consuming as I needed to first cut out a lot of the excess and then make a whole bunch of cuts along the arch. This was required to be able to fold the covering over and iron it down without pinching and creasing. In this case it was more for aesthetics then protection because this part will be covered by the canopy. Once that was ironed down I used some tweezers (resting state was clamped) to hold the excess of the snipped pieces while I used an x-acto knife to cut off the excess. You can see the end result in the featured image of the article at the top.
I finished off the day by starting to cover the R side of the fuselage, from the pilots perspective in the cockpit. You want to start at the back and work your way to the front (if you are not attempting to do it in one solid piece). This is because as you overlap the back pieces the wind will rush over it instead of potentially catching an edge and getting underneath.
I cut this piece to go from about where the push rod comes out up to where the start of the cutout for the wing is. I lined the top, straight edge, of the covering along the top edge of the fuselage side and tacked it down. I then ironed the entire perimeter of the covering. Since there are cutouts to lighten the fuselage I was then able to use the ‘blow dryer’ on hot to shrink the covering, making sure to always point the nozzle away from the seams (edges). Once satisfied I used the iron to do some final touch ups while Peter did some final touch ups with the blow dryer. the final result can be seen below.

That wrapped up another great couple hours of working on my plane. John stopped by to check things out and watch me work alongside Peter to keep each other company I guess, lol 🙂 . It’s great that John stops by as picked up quite a few pointers this way and its nice that people take an interest in the progress that is being made.
I’ve been loving the process and seeing the plane take shape. Things are really coming together now and am hoping that on Tuesday I will get the rest of the fuselage side covered as well as the other side. I’m not exactly sure at this point what will come after that! So, just like me, you’ll have to stay tuned and check back later 😀